Trials and tribulations of Sylvia’s single central
Case introduction
Every now and again a case will come through the door that somehow tests all resolve.
As much as people like to portray that restoring a single central doesn’t pose a problem and make suggestions of having 100% success rates, I just don’t believe it for one minute. There are just so many factors to consider that can make it almost impossible to predict a perfect outcome every time.
There are factors outside that of just the restoration, especially where implants are concerned. Factors like how the implant has been placed or when it was placed and how much the hard and soft tissue may have resorbed.
Additional factors can be the biological width and golden proportion. All of these factors are of course dictated to by how the tooth may have been lost in the first place.
In Sylvia’s case her need for restorative treatment was the result of a failed root canal treatment.
Our patient had several options, to either have a denture fabricated (this being the cheapest solution), bridging the gap (this would have meant the preparation of what were perfectly healthy teeth adjacent to the affected site) or a third and final solution being implant surgery (if the patient was viable).
Implant surgery would, of course, offer Sylvia a great fixed solution which ultimately simplified the whole restorative procedure.
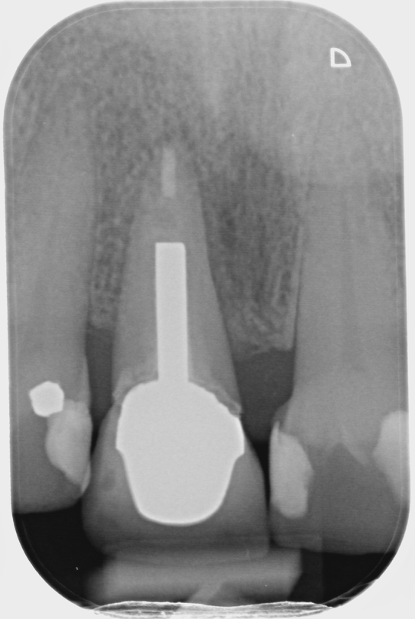
Fig 1- Shows the RCT of UR1
Managing the parameters
With the upper right 1 having now been extracted, an implant was then placed and we were able to set about restoring Sylvia’s single central.
Although it isn’t particularly clear, there are two issues, one being the biological width of the space we were restoring exaggerated by the flat papilla and curvature of the standing teeth interproximally, plus the very shallow guidance with slightly proclined lower central incisors, making the function a real issue.
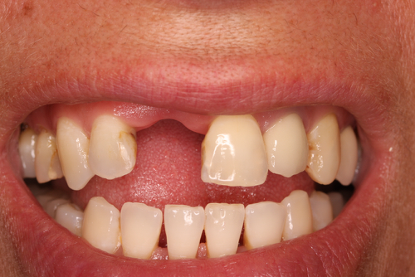
Fig 2 – Post extraction and healing
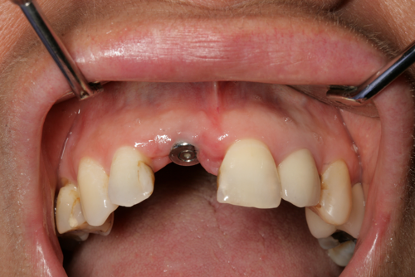
Fig 3 – Implant placed and sulcus former in situ
Added to these issues Sylvia had now become “Extremely” dentally aware. She was certain beyond anything else she wanted a perfect mirror image of the standing upper left central, and who can blame her, right? Taking solace in the belief that we would want nothing but the best for our mouths.
The limitations imposed by provisionals
How is it that dentures can achieve such trickery so as to lull us all into a false sense of security, that we can always achieve what a denture can in the final restoration?
Pink gum work was used interproximally to aid towards the retention and aesthetics. With the use of a flange (however big or small), the tooth can emerge from whatever angle in order to achieve perfect harmony.
When we come to restore the final crown we are completely dictated by the position of the fixture, soft tissue, occlusion and biological width.
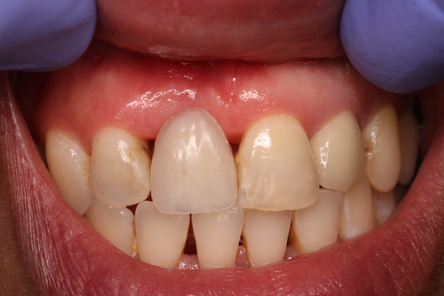
Fig 4 – The simple yet very effective spoon denture
Although the dreaded denture didn’t represent a perfect colour match, it did, however, achieve an emergence that was almost impossible for us to achieve with the crown.
It was also a length that the patient really liked and without comprehension, should it be functionally inaccurate the denture would simply dislodge. How would we overcome these important factors for the patient? Attempt number one went as we’d expected really.
In terms of patient management, I think it is crucially important to be realistic with any patient and being extremely careful not to over-promise on that all-important first attempt.
In my experience, you get far more compliance and a patient who ultimately is more willing to work with you in their journey, as opposed to becoming irritable and impatient when they have become so excited, looking forward to their new tooth being fitted, only to be leaving without it because it wasn’t quite right.
The try-in phase
As you can see from fig 5, there are some inaccuracies aside from the fact it is too low in value. What this picture doesn’t highlight is the lack of interproximal profile, leaving large unwanted triangles.
It was also a little too short for the patients liking – this had been intentional, allowing for any functional issues but as best we could, this needed to be addressed. It was at this stage that we elected that we would like to leave this current crown in situ, whilst we set about having another go in fabricating a second crown.
Having learned from the first attempt, it was agreed some soft tissue adjustment would be required in order to reduce those interdental spaces.
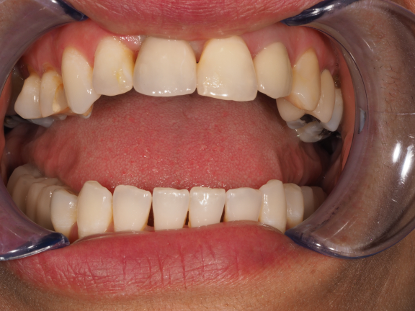
Fig 5 – In the second restoration it was important to also increase profile both in emergence but also in interproximal contouring, using the existing crown as the template
Final result and fit
In the second restoration, it was important to increase the profile, both in emergence but also in interproximal contouring, using the existing crown as the template.
Emerging gently from the shoulder of the ti-base to 05mm of the gingival crest, then emerging more acutely once at the approximate height of the papilla, therefore closing both mesial and distal triangles from the palatal aspect.
This would allow us to maintain a nice height of contour from the labial face, therefore giving the illusion of a narrower tooth.
As for the length, it required that we would have to thicken the incisal edge from the labial ever so slightly. We could then reduce from the palatal aspect, avoiding any weakness around the screw hole, given this was a screw-retained restoration.
Although the papilla is in a far better position at this point, time would determine if this could be maintained as things settled.
Aesthetically the patient was over the moon. With perseverance and the willingness to have more than one attempt in starting from scratch, as opposed to modifying an existing crown, not only did it give the patient the opportunity to see progress but it also gives fantastic reference points for the second attempt.
Of course it could be argued as to why a provisional hadn’t been fabricated?
Sometimes as in this case, the patient simply wanted to remain with her denture and that wish had to be respected for whatever reason.

Fig 6 – Shows the final restoration at fit, blanching of course
Three-month post fit
Fig 7 shows the three-month post fit. Unfortunately, the mesial papilla had receded but we had maintained the distal.
However, the patient through care and time spent in helping her through the journey was still completely over the moon and in her opinion made it look all the more natural.
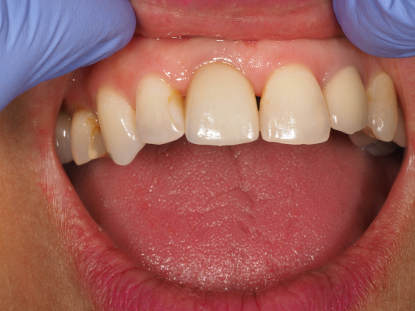
Fig 7 – Three-months post fit
By Tony Atkins,
Senior Technician
From the blog
Winners of Best Dental Laboratory Award
We are proud to be winners in the category of Best Dental Laboratory at this year's Dentistry Awards. It is a great honour, and we thank everyone who has been a part of our journey. Thank you also to FMC and dentistry.co.uk for a great event! Jon Dolding, CDL...

